Bygningssæt: Forskelle mellem versioner
Galadan (diskussion | bidrag) No edit summary |
Galadan (diskussion | bidrag) No edit summary |
||
| Linje 28: | Linje 28: | ||
Eksempler på forbindelser med sætbygninger herunder: | Eksempler på forbindelser med sætbygninger herunder: | ||
[[File:connexion1.png|left|325px]] [[File:connexion2.png|center|370px]] | [[File:connexion1.png|left|325px]] [[File:connexion2.png|center|370px]] | ||
===Overblik over bygningssæt=== | |||
{| style="text-align: center" class="mw-collapsible mw-collapsed" | |||
!colspan="11"|Three Glacier Giants | |||
|- | |||
|Bygning | |||
|colspan="1"|Størrelse | |||
|colspan="1"|Fordele | |||
|colspan="1"|Setbonus | |||
|- | |||
|[[File:IceMountainTroll.png|80px|Ice Mountain Troll]] | |||
|5x4 | |||
|[[File:Coin_small.png|30px|Coins]] | |||
|[[File:Supply_small.png|30px|Supplies]] ----- [[File:Coin_small.png|30px|Coins]] ----- [[File:Kpicon.png|30px|Knowledge Point]] | |||
|- | |||
|[[File:OrcVortex.png|80px|Orc Vortex]] | |||
|2x4 | |||
|[[File:Supply_small.png|30px|Supplies]] or [[File:Orcs.png|30px|Orcs]] | |||
|[[File:Supply_small.png|30px|Supplies]] ----- [[File:Supply_small.png|30px|Supplies]] ----- [[File:Supply_small.png|30px|Supplies]] | |||
or | |||
[[File:Orcs.png|30px|Orcs]] ----- [[File:Orcs.png|30px|Orcs]] ----- [[File:Orcs.png|30px|Orcs]] | |||
|- | |||
|[[File:GiantsHand.png|80px|Giants Hand]] | |||
|4x3 | |||
|[[File:Gds1p1.png|Basic Goods]] | |||
|[[File:Gds1p1.png|30px|Basic Goods]] ----- [[File:Gds1p2.png|30px|Basic Goods]] ----- [[File:Gds1.png|30px|Basic Goods]] | |||
|- | |||
|[[File:FrozenFountain.png|80px|Frozen Fountain]] | |||
|2x3 | |||
|[[File:Supply_small.png|30px|Supplies]] or [[File:Mana.png|30px|Mana]] | |||
|[[File:Supply_small.png|30px|Supplies]] ----- [[File:Supply_small.png|30px|Supplies]] ----- [[File:Supply_small.png|30px|Supplies]] | |||
or | |||
[[File:Mana.png|30px|Mana]] ----- [[File:Mana.png|30px|Mana]] ----- [[File:Mana.png|30px|Mana]] | |||
|} | |||
{| style="text-align: center" class="mw-collapsible mw-collapsed" | |||
!colspan="11"|Woodelvenstock Bygningssæt | |||
|- | |||
|Bygning | |||
|colspan="1"|Størrelse | |||
|colspan="1"|Fordele | |||
|colspan="1"|Sætbonus | |||
|- | |||
|[[File:Event_Sum_Set_2x2_0000.png|80px|VIP Lounge]] | |||
|2x2 | |||
|[[File:Population_small_elves.png|25px|Befolkning]] og [[File:Coin_small.png|30px|Mønter]] | |||
|[[File:Coin_small.png|30px|Mønter]] ---- [[File:Coin_small.png|30px|Mønter]] ---- [[File:Supply_small.png|30px|Forsyninger]] ----- [[File:Supply_small.png|30px|Forsyninger]] | |||
|- | |||
|[[File:Event_Sum_Set_3x1_0000.png|80px|Lindworm Area]] | |||
|3x1 | |||
|[[File:Gds3p2.png|30px|Magiske varer]]<br>eller [[File:Mana.png |30px|Mana]] | |||
|[[File:Gds3p2.png|30px|Magiske varer]] ----- [[File:Gds3p2.png|30px|Magiske varer]] -----[[File:Gds3p2.png|30px|Magiske varer]] ----- [[File:Gds3p2.png|30px|Magiske varer]]<br> eller [[File:Mana.png|30px|Mana]] ----- [[File:Mana.png|30px|Mana]] ----- [[File:Mana.png|30px|Mana]] ---- [[File:Mana.png|30px|Mana]] | |||
|- | |||
|[[File:Event_Sum_Set_3x4_01_0022.png|80px|Hovedscene]] | |||
|3x4 | |||
|[[File:Population_small_elves.png|25px|Befolkning]] og [[File:Supply_small.png|25px|Forsyninger]]<br>eller [[File:Gds3p2.png|30px|Magiske varer]]<br>eller [[File:Mana.png|30px|Mana]]<br>eller [[File:Seed_icon.png |30px|Guddommelige frø]] | |||
|[[File:Supply_small.png|25px|Forsyninger]] ----- [[File:Supply_small.png|25px|Forsyninger]] ----- [[File:Supply_small.png|25px|Forsyninger]] ----- [[File:Kpicon.png|30px|Videns point]]<br> eller [[File:Gds3p2.png|30px|Magiske varer]] ----- [[File:Gds3p2.png|30px|Magiske varer]] ----- [[File:Gds3p2.png|30px|Magiske varer]] ----- [[File:Kpicon.png|30px|Videns point]]<br>eller [[File:Mana.png|30px|Mana]] ----- [[File:Mana.png|30px|Mana]] ----- [[File:Mana.png|30px|Mana]] ----- [[File:Kpicon.png|30px|Videns point]]<br>eller [[File:Seed_icon.png|30px|Guddommelige frø]] ----- [[File:Seed_icon.png|30px|Guddommelige frø]] ----- [[File:Seed_icon.png|30px|Guddommelige frø]] ----- [[File:Kpicon.png|30px|Videns point]] | |||
|- | |||
|[[File:Event_Sum_Set_2x3_0000.png|80px|Mosh Grav]] | |||
|2x3 | |||
|[[File:Population_small_elves.png|25px|Befolkning]] og [[File:Gds3p2.png|30px|Magiske varer]] | |||
|[[File:Gds3p2.png|30px|Magiske varer]] ----- [[File:Gds3p2.png|30px|Magiske varer]] ----- [[File:Gds3p2.png|30px|Magiske varer]] ---- [[File:Gds3p2.png|30px|Magiske varer]] | |||
|- | |||
|[[File:Event_Sum_3x3_03_0000.png|80px|Danse grund]] | |||
|3x3 | |||
|[[File:Gds3p2.png|30px|Magiske varer]] | |||
|[[File:Gds3p2.png|30px|Magiske varer]] ----- [[File:Gds3p2.png|30px|Magiske varer]] ----- [[File:Gds3p2.png|30px|Magiske varer]] ---- [[File:Gds3p2.png|30px|Magiske varer]] | |||
|} | |||
<br> | |||
{| style="text-align: center" class="mw-collapsible mw-collapsed" | |||
!colspan="4"|The Harvest Festival Building Set 1 and 2 | |||
|- | |||
|colspan="4" style="text-align:center" |[[File:SummerSet2018_1.png|650px|Harvest Temple Set]] | |||
Set 1: Harvest Temple | |||
|- | |||
|colspan="1"|Bygning | |||
|colspan="1"|Størrelse | |||
|colspan="1"|Fordele | |||
|colspan="1"|Set Bonus | |||
|- | |||
|[[File:Event_Aut_Set_2x6_02_0000.png|150px|Sun Temple Complex]] | |||
|2x6 | |||
|[[File:Population_small_elves.png|25px|Population]] and [[File:Coin_small.png|30px|Coins]] | |||
|[[File:Coin_small.png|30px|Coins]] ---- [[File:Coin_small.png|30px|Coins]] ---- [[File:Coin_small.png|30px|Coins]] ----- [[File:Coin_small.png|30px|Coins]] | |||
|- | |||
|[[File:Event_Aut_Set_2x6_01_0000.png|150px|Moon Temple Complex]] | |||
|2x6 | |||
|[[File:Population_small_elves.png|25px|Population]] and [[File:Supply_small.png|30px|Supplies]] | |||
|[[File:Supply_small.png|30px|Supplies]] ----- [[File:Supply_small.png|30px|Supplies]] ----- [[File:Supply_small.png|30px|Supplies]] ----- [[File:Supply_small.png|30px|Supplies]] | |||
|- | |||
|[[File:Event_Aut_Set_3x1_01.png|100px|Temple Entrance]] | |||
|3x1 | |||
|[[File:Gds1p1.png|30px|Basic Goods]] | |||
|[[File:Gds1p2.png|30px|Basic Goods]] ----- [[File:Gds1.png|30px|Basic Goods]] ----- [[File:Gds1p1.png|30px|Basic Goods]] ----- [[File:Brokenshard.png|30px|Broken Shard]] | |||
|- | |||
|[[File:Event_Aut_Set_3x3_01_0000.png|120px|Cornucopia Sanctuary]] | |||
|3x3 | |||
|[[File:Population_small_elves.png|25px|Population]] and [[File:Gds1p2.png|30px|Basic Goods]] | |||
|[[File:Gds1.png|30px|Basic Goods]] ----- [[File:Gds1p1.png|30px|Basic Goods]] ----- [[File:Gds1p2.png|30px|Basic Goods]] ----- [[File:Kpicon.png|30px|Knowledge Point]] | |||
|- | |||
|[[File:Event_Aut_Set_3x2_01_0000.png|120px|Harvest Storage]] | |||
|3x2 | |||
||[[File:Gds1.png|30px|Basic Goods]] | |||
|[[File:Gds1p1.png|30px|Basic Goods]] ----- [[File:Gds2p2.png|30px|Basic Goods]] ----- [[File:Gds1.png|30px|Basic Goods]] ----- [[File:Brokenshard.png|30px|Broken Shard]] | |||
|- | |||
!colspan="4" | | |||
|- | |||
|colspan="4" style="text-aligh: center" |[[File:SummerSet2018_2.png|600px|Shrines of Sun and Moon Set]] | |||
Set 2: Shrines of Sun and Moon | |||
|- | |||
|colspan="1"|Bygninger | |||
|colspan="1"|Størrelse | |||
|colspan="1"|Fordele | |||
|colspan="1"|Set Bonus | |||
|- | |||
|[[File:Event_Aut_5x3_01_0000.png|120px|Kirit, Weasel God of Night Fruit]] | |||
|5x3 | |||
|[[File:Population_small_elves.png|25px|Population]] and [[File:Gds2p2.png|30px|Crafted Goods]] | |||
|[[File:Gds2p2.png|30px|Crafted Goods]] -----[[File:Gds2p2.png|30px|Crafted Goods]] ----- [[File:Kpicon.png|30px|Knowledge Point]] | |||
|- | |||
|[[File:Event_Aut_4x4_01_0000.png|120px|Krarak, Bird God of Sun Harvest]] | |||
|4x4 | |||
|[[File:Population_small_elves.png|25px|Population]] and [[File:Gds3p2.png|30px|Magical Goods]] | |||
|[[File:Gds3p2.png|30px|Magical Goods]] -----[[File:Gds3p2.png|30px|Magical Goods]] ----- [[File:Kpicon.png|30px|Knowledge Point]] | |||
|- | |||
|[[File:Event_Aut_1x1_01.png|80px|Shrine of Kirit]] | |||
|1x1 | |||
|[[File:Supply_small.png|30px|Supplies]]<br>or [[File:Gds3p1.png|30px|Magical Goods]]<br> or [[File:Mana.png|30px|Mana]] | |||
|[[File:Supply_small.png|30px|Supplies]] ----- [[File:Supply_small.png|30px|Supplies]] ----- [[File:Supply_small.png|30px|Supplies]]<br>or [[File:Gds3p1.png|30px|Magical Goods]] ----- [[File:Gds3p1.png|30px|Magical Goods]] ----- [[File:Gds3p1.png|30px|Magical Goods]]<br>or [[File:Mana.png|30px|Mana]] ----- [[File:Mana.png|30px|Mana]] ----- [[File:Mana.png|30px|Mana]] | |||
|- | |||
|[[File:Event_Aut_1x1_02.png|80px|Shrine of Krarak]] | |||
|1x1 | |||
|[[File:Supply_small.png|30px|Supplies]]<br>or [[File:Gds3p1.png|30px|Magical Goods]]<br> or [[File:Seed_icon.png|30px|Divine Seeds]] | |||
|[[File:Supply_small.png|30px|Supplies]] ----- [[File:Supply_small.png|30px|Supplies]] ----- [[File:Supply_small.png|30px|Supplies]]<br>or [[File:Gds3p1.png|30px|Magical Goods]] ----- [[File:Gds3p1.png|30px|Magical Goods]] ----- [[File:Gds3p1.png|30px|Magical Goods]]<br>or [[File:Seed_icon.png|30px|Divine Seeds]] ----- [[File:Seed_icon.png|30px|Divine Seeds]] ----- [[File:Seed_icon.png|30px|Divine Seeds]] | |||
|- | |||
|} | |||
{| style="text-align: center" class="mw-collapsible mw-collapsed" | |||
!colspan="4"|The Winter Magic Set 1 and 2 | |||
|- | |||
|colspan="4" style="text-align:center" |[[File:WinterSet2018_1.png|650px|Winter Market Set]] | |||
Set 1: Winter Market Set | |||
|- | |||
|colspan="1"|Bygning | |||
|colspan="1"|Størrelse | |||
|colspan="1"|Fordele | |||
|colspan="1"|Set Bonus | |||
|- | |||
|[[File:Event_Win_Set_2x3_01_0000.png|150px|Market Stalls]] | |||
|2x3 | |||
|[[File:Culture.png|30px|Culture]] and [[File:Gds1p1.png|30px|Basic Goods]] | |||
|[[File:Gds1p1.png|30px|Basic Goods]] ---- [[File:Gds1p1.png|30px|Basic Goods]] | |||
|- | |||
|[[File:Event_Win_Set1_2x4_01.png|150px|Winter Fair]] | |||
|2x4 | |||
|[[File:Culture.png|30px|Culture]] and [[File:Gds2p1.png|30px|Crafted Goods]] | |||
|[[File:Gds2p1.png|30px|Crafted Goods]] ----- [[File:Gds2p1.png|30px|Crafted Goods]] | |||
|- | |||
|[[File:Event_Win_3x2_Set1_01_0000.png|120px|Elvenade Booth]] | |||
|3x2 | |||
|[[File:Culture.png|30px|Culture]] and [[File:Supply_small.png|30px|Supplies]] | |||
|[[File:Supply_small.png|30px|Supplies]] ----- [[File:Coin_small.png|30px|Coins]] ----- [[File:Supply_small.png|30px|Supplies]] | |||
|- | |||
|[[File:Event_Win_Set1_3x3_01_0000.png|100px|Sled Carousel]] | |||
|3x3 | |||
|[[File:Culture.png|30px|Culture]] and [[File:Gds3p1.png|30px|Magical Goods]] | |||
|[[File:Gds3p1.png|30px|Magical Goods]] ----- [[File:Gds3p1.png|30px|Magical Goods]] ----- [[File:Brokenshard.png|30px|Broken Shard]] | |||
|- | |||
|[[File:Event_Win_Set1_3x6_01_0000.png|120px|Frost Carved Christmas Tree]] | |||
|3x6 | |||
|[[File:Culture.png|30px|Culture]] and [[File:Supply_small.png|30px|Supplies]] | |||
|[[File:Supply_small.png|30px|Supplies]] ----- [[File:Supply_small.png|30px|Supplies]] ----- [[File:Kpicon.png|30px|Knowledge Point]] ----- [[File:Kpicon.png|30px|Knowledge Point]]<br>or [[File:Gds3p1.png|30px|Magical Goods]] ----- [[File:Gds3p1.png|30px|Magical Goods]] ----- [[File:Kpicon.png|30px|Knowledge Point]] ----- [[File:Kpicon.png|30px|Knowledge Point]]<br>or [[File:Mana.png|30px|Mana]] ----- [[File:Mana.png|30px|Mana]] ----- [[File:Kpicon.png|30px|Knowledge Point]] ----- [[File:Kpicon.png|30px|Knowledge Point]] | |||
|- | |||
!colspan="4" | | |||
|- | |||
|colspan="4" style="text-aligh: center" |[[File:WinterSet2018_2.png|600px|Snow Owls Set]] | |||
Set 2: Snow Owls Set | |||
|- | |||
|colspan="1"|Bygning | |||
|colspan="1"|Størrelse | |||
|colspan="1"|Fordele | |||
|colspan="1"|Set Bonus | |||
|- | |||
|[[File:Event_Win_Set2_2x4_0000.png|120px|Clocktower Owls]] | |||
|2x4 | |||
|[[File:Populationadd.png|25px|Population]] and [[File:Culture.png|30px|Culture]] and [[File:Coin_small.png|30px|Coins]] | |||
|[[File:Coin_small.png|30px|Coins]] ----- [[File:Kpicon.png|30px|Knowledge Point]] | |||
|- | |||
|[[File:Event_Win_Set2_5x2_0000.png|120px|Stable of the Snow Owl]] | |||
|5x2 | |||
|[[File:Populationadd.png|25px|Population]] and [[File:Culture.png|30px|Culture]] and [[File:Supply_small.png|30px|Supplies]] | |||
|[[File:Supply_small.png|30px|Supplies]] ----- [[File:Kpicon.png|30px|Knowledge Point]]<br>or [[File:Gds3p1.png|30px|Magical Goods]] ----- [[File:Kpicon.png|30px|Knowledge Point]]<br>or [[File:Mana.png|30px|Mana]] ----- [[File:Kpicon.png|30px|Knowledge Point]] | |||
|- | |||
|[[File:Event_Win_Set2_3x4_01_0000.png|120px|Yeti Santas Christmas Factory]] | |||
|3x4 | |||
|[[File:Populationadd.png|25px|Population]] and [[File:Culture.png|30px|Culture]] and [[File:Supply_small.png|30px|Supplies]] | |||
|[[File:Supply_small.png|30px|Supplies]] ----- [[File:Kpicon.png|30px|Knowledge Point]]<br>or [[File:Gds3p1.png|30px|Magical Goods]] ----- [[File:Kpicon.png|30px|Knowledge Point]]<br>or [[File:Mana.png|30px|Mana]] ----- [[File:Kpicon.png|30px|Knowledge Point]]<br>or [[File:Seed_icon.png|30px|Divine Seeds]] ----- [[File:Kpicon.png|30px|Knowledge Point]] | |||
|- | |||
|} | |||
<br> | |||
{| style="text-align: center" class="mw-collapsible mw-collapsed" | |||
!colspan="11"|Carnival Building Set | |||
|- | |||
|colspan="4" style="text-align:center" |[[File:Evt_Car_XIX_Set.png|500px|Carnival Set]] | |||
Carnival Set | |||
|- | |||
|Building | |||
|colspan="1"|Size | |||
|colspan="1"|Benefits | |||
|colspan="1"|Set Bonus | |||
|- | |||
|[[File:Evt_Car_XIX_Tavern.png|80px|Jester’s Tavern]] | |||
|4x4 | |||
|[[File:Culture.png|25px|Culture]] and [[File:Good_elixir_small.png|Elixir]] | |||
|[[File:Good_magic_dust_small.png|Magic Dust]] ---- [[File:Good_gems_small.png|Gems]] ----- [[File:Kpicon.png|30px|Knowledge Points]] | |||
|- | |||
|[[File:Evt_Car_XIX_Band.png|80px|Marching Band]] | |||
|4x2 | |||
|[[File:Culture.png|25px|Culture]] and [[File:Supply_small.png|25px|Supplies]]<br>or [[File:Gds3p1.png|30px|Magical Goods]]<br>or [[File:Mana.png|30px|Mana]]<br>or [[File:Seed_icon.png|30px|Divine Seeds]] | |||
|[[File:Supply_small.png|25px|Supplies]] ----- [[File:Supply_small.png|25px|Supplies]]<br> or [[File:Gds3p1.png|30px|Magical Goods]] ----- [[File:Gds3p1.png|30px|Magical Goods]]<br> or [[File:Mana.png|30px|Mana]] ----- [[File:Mana.png|30px|Mana]]<br> or [[File:Seed_icon.png|30px|Divine Seeds]] ----- [[File:Seed_icon.png|30px|Divine Seeds]] | |||
|- | |||
|[[File:Evt_Car_XIX_Fountain.png|80px|Revelers Fountain]] | |||
|3x3 | |||
|[[File:Culture.png|25px|Culture]] and [[File:Supply_small.png|25px|Supplies]]<br>or [[File:Gds3p1.png|30px|Magical Goods]]<br>or [[File:Mana.png|30px|Mana]] | |||
|[[File:Supply_small.png|25px|Supplies]] ----- [[File:Supply_small.png|25px|Supplies]] ----- [[File:Supply_small.png|25px|Supplies]] ----- [[File:Supply_small.png|25px|Supplies]]<br> or [[File:Gds3p1.png|30px|Magical Goods]] ----- [[File:Gds3p1.png|30px|Magical Goods]] ----- [[File:Gds3p1.png|30px|Magical Goods]] ----- [[File:Gds3p1.png|30px|Magical Goods]]<br>or [[File:Mana.png|30px|Mana]] ----- [[File:Mana.png|30px|Mana]] ----- [[File:Mana.png|30px|Mana]] ----- [[File:Mana.png|30px|Mana]] | |||
|- | |||
|[[File:Evt_Car_XIX_Banquet.png|80px|Banquet]] | |||
|5x3 | |||
|[[File:Culture.png|25px|Culture]] and [[File:Supply_small.png|25px|Supplies]] | |||
|[[File:Supply_small.png|25px|Supplies]] ----- [[File:Brokenshard.png|30px|Broken Shard]] ----- [[File:Kpicon.png|30px|Knowledge Points]] | |||
|- | |||
|[[File:Evt_Car_XIX_Fireworks.png|80px|Festive Fireworks]] | |||
|2x3 | |||
|[[File:Culture.png|25px|Culture]] and [[File:Coin_small.png|30px|Coins]] | |||
|[[File:Coin_small.png|30px|Coins]] ----- [[File:Coin_small.png|30px|Coins]] | |||
|} | |||
Versionen fra 21. mar. 2019, 20:25

Bygningssæt
Et bygningssæt er sammensat af et bestemt antal bygninger. Enhver given sætbygning kan kun tilhøre ét bygningssæt. Bygdem ved siden af hinanden for at udløse deres potentiale! Jo flere unikke sætbygninger du placerer ved siden af hinanden, jo højere vil deres bonus være!
Du vinder dem under begivenheder. De vil være markeret med en lille markør, eksempelvis er de fire bygninger som er en del af Vinterbegivenheden 2017 markeret med denne markør. ![]() . Denne information bliver vist i værktøjstip, når du holder musen over bygningerne. Når mindst to sætbygninger rører hinanden, bliver markøren fremhævet.
. Denne information bliver vist i værktøjstip, når du holder musen over bygningerne. Når mindst to sætbygninger rører hinanden, bliver markøren fremhævet. ![]()
Sætbonus
Hvis du placerer bygninger som hører til samme bygningssæt ved siden af hinanden, vil du få nogen yderligere bonusser fordi bygningerne har en "sæt"-bonus. Når en bygning med en sætbonus placeres ved siden af en anden (anderledes) bygning fra samme sæt, vil det aktivere en bonus.
Vi vil her bruge Isbjergtrold sætbygningen som eksempel:


Isbjergtrold kommer med en sætbonus. Når den står ved siden af andre bygninger som tilhører samme sæt (I dette tilfælde Vintersættet) vil den modtage yderligere bonusser. Isbjergtrold producerer normalt kun mønter, men når den er i berøring med andre bygninger fra dens sæt vil den:
- Producere ekstra forsyninger (når den rører mindst én anden bygning fra samme sæt)
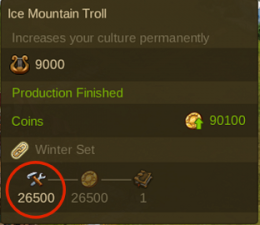
- Producere yderligere mønter (Når den rører to andre unikke bygninger).
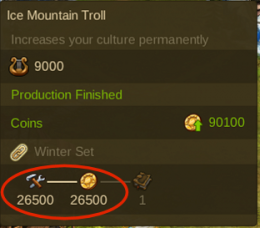
- Producere yderligere videnspoint (Når den rører mindst 3 unikke bygninger).
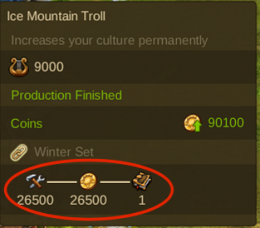


Bonusserne lagres, så du vil modtage både bonus nummer 1 og 2, hvis bygninger rører to andre unikke bygninger. Detaljerne om hvor meget bonus der gives, vil du kunne se i værktøjstip for de enkelte bygninger ved at holde cursoren over dem.
Sætbygninger i forbindelse med rådhuset
Enhver bygning i et givent sæt kan virke som forbindelse mellem vejen og andre sætbygninger fra samme sæt. Forbind bygningen til Rådhuset med en vej, og placer resten af sætbygningerne ved siden af bygningen. Alle sættets bygninger vil nu have vejforbindelse.
- En sætbygning skal være forbundet til rådhuset.
- Den forbundne sætbygning virker som forbindelse til resten af sættets bygninger.
Eksempler på forbindelser med sætbygninger herunder:


Overblik over bygningssæt
| Three Glacier Giants | ||||||||||
|---|---|---|---|---|---|---|---|---|---|---|
| Bygning | Størrelse | Fordele | Setbonus | |||||||
|
|
5x4 | |||||||||

|
2x4 | or
| ||||||||

|
4x3 | |||||||||

|
2x3 | or
| ||||||||
| Woodelvenstock Bygningssæt | ||||||||||
|---|---|---|---|---|---|---|---|---|---|---|
| Bygning | Størrelse | Fordele | Sætbonus | |||||||

|
2x2 | |||||||||

|
3x1 | eller |
eller | |||||||

|
3x4 | eller eller eller |
eller eller eller | |||||||

|
2x3 | |||||||||
| 3x3 | ||||||||||
| The Harvest Festival Building Set 1 and 2 | |||
|---|---|---|---|
| Harvest Temple Set
Set 1: Harvest Temple | |||
| Bygning | Størrelse | Fordele | Set Bonus |
| Sun Temple Complex | 2x6 | ||
| Moon Temple Complex | 2x6 | ||
| Temple Entrance | 3x1 | ||
| Cornucopia Sanctuary | 3x3 | ||
| Harvest Storage | 3x2 | ||
| Shrines of Sun and Moon Set
Set 2: Shrines of Sun and Moon | |||
| Bygninger | Størrelse | Fordele | Set Bonus |
| Kirit, Weasel God of Night Fruit | 5x3 | ||
| Krarak, Bird God of Sun Harvest | 4x4 | ||
| Shrine of Kirit | 1x1 | or or |
or or |
| Shrine of Krarak | 1x1 | or or |
or or |
| The Winter Magic Set 1 and 2 | |||
|---|---|---|---|
| Winter Market Set
Set 1: Winter Market Set | |||
| Bygning | Størrelse | Fordele | Set Bonus |
| Market Stalls | 2x3 | ||
| Winter Fair | 2x4 | ||
| Elvenade Booth | 3x2 | ||
| Sled Carousel | 3x3 | ||
| Frost Carved Christmas Tree | 3x6 | or or | |
| Snow Owls Set
Set 2: Snow Owls Set | |||
| Bygning | Størrelse | Fordele | Set Bonus |
| Clocktower Owls | 2x4 | ||
| Stable of the Snow Owl | 5x2 | or or | |
| Yeti Santas Christmas Factory | 3x4 | or or or | |
| Carnival Building Set | ||||||||||
|---|---|---|---|---|---|---|---|---|---|---|

Carnival Set | ||||||||||
| Building | Size | Benefits | Set Bonus | |||||||
| Jester’s Tavern | 4x4 | |||||||||
| Marching Band | 4x2 | or or or |
or or or | |||||||
| Revelers Fountain | 3x3 | or or |
or or | |||||||
| Banquet | 5x3 | |||||||||
| Festive Fireworks | 2x3 | |||||||||